Ain’t she a beaut?

Nick got this bed frame from his parents, who got it from his grandparents. This was his bed right out of college in his first apartment. I can’t say I was a fan right off the bat, rather ours was a slow burn love. I pretty much thought it was a rusty POS, but as we moved into our new house and were faced with the task of furnishing an entire home, our existing crap started to look a lot better (funny how that works).
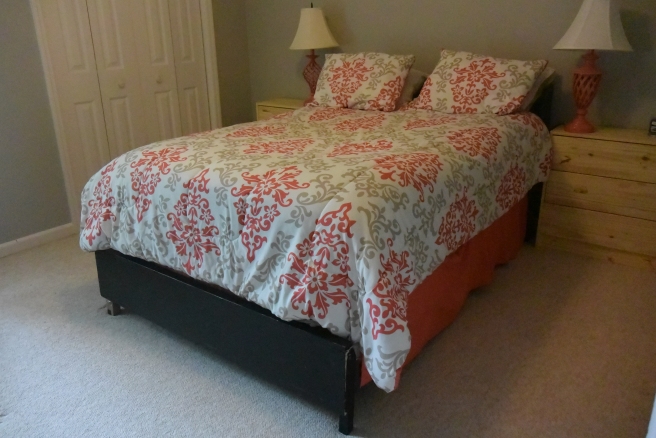
This is our current set up for the guest bedroom:

This bed isn’t bad, I actually got it for free from my grandma’s basement (sensing a theme? we like free furniture, no shame). It certainly served its purpose but the paint was peeling and the legs kept breaking and forcing the sleeper into a tricycle situation. All signs were pointing to a new bed for our guest room.

I started by reading a few Pinterest tutorials (this is how I start EVERY project. What did people do before Pinterest??) on refinishing metal furniture. From my reading, the basics steps were as follows:
- Clean
- Wire brush all of that rust off
- Sand
- Clean again
- Prime
- Paint
Seems simple enough, yes?

Supplies needed:
- Wire brush
- Tarp
- Rust preventing primer
- Rust preventing paint
- Optional: Gloves
I used Rust-oleum brand paints:
I used a white primer. Ideally I would have used black (to prevent any coverage issues), but they were out when I went to the store and I knew I would be doing mutliple coats anyway. I chose to use a satin finish vs. a gloss, due to the amount of rust and lack of confidence I had in my skills for this project. A satin finish will hide all of your mistakes better than a gloss, which reflects more light.

I used this wire brush, it was very basic but we already owned it so I didn’t look to buy another. In retrospect, I would use something more like this:
I think the handle would be easier on your hands and that scraper would come in handy. I also like the curve of it, I think that would help get into all of the nooks and crannies. I ran into some issues trying to get all of the rust out of the pieces where the rails join to the headboard (seen below).
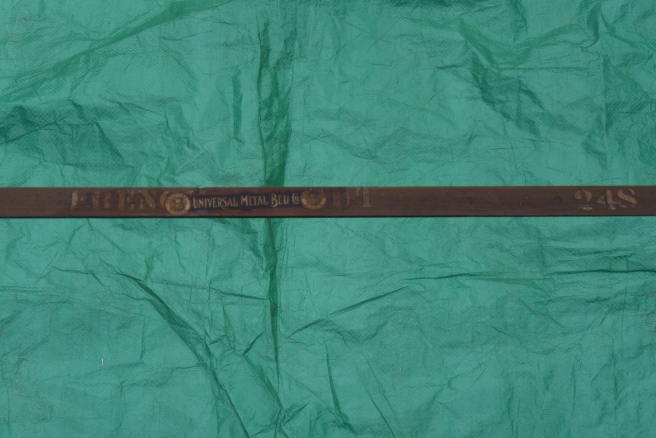
As I was setting the bed up, I noticed this sticker on one of the rails. Since we don’t know much about the bed, I tried to Google the name, Universal Metal Bed Company, but not much came up. All I could find were some business registries from New York and other places between 1915-1921. So I think it’s safe to say our bed is around 100 years old, or at least on its way.

Our bed was stored in our garage for a good year before I began this project and there were spider egg sacs GALORE. I started simply wiping the bed down with a microfiber cloth, but after the discovery of the third egg sac, I put on my damn gloves. No egg sac to skin touching, please.
Removing the rust was the worst part of this project, hands down. I’m not even going to lie to you guys. I will qualify it to say our bed was ESPECIALLY rusty, so if you are working at a lower rust level, it might not be so bad. It took me about 4 hours (which was about 3 longer than I was anticipating) to get all of the rust off. This included water breaks and general complaining/pouting/screaming “WHYYY MEEE” breaks. In the last hour I started getting to that rage point of a house project. You know, when you are maniacally scrubbing with rust particles flying everywhere, not even GAF. And thinking thoughts like “WHY THE F&*$ CAN’T WE EVER JUST BUY FURNITURE” (keep in mind that this project was my idea) and “I HATE EVERYTHING ABOUT THIS DUMB HOUSE AND THIS DUMB FURNITURE”. I also started to get concerned about my hands. The constant pressure and grip on the wire brush resulted in claw-like cramping and pain in my hand.
EVENTUALLY all of the rust was gone. According to our weather for this past Saturday, it was supposed to rain around 3:00 and that is precisely when I finished all of the de-rusting. I re-checked the weather and realized it was supposed to hold off for another hour and that I could fit in a coat of priming.

There was rust dust all over the bed, so I decided to hose them down rather than wipe off with a cloth again. In my rage fit, I carried over one of the bed rails to our hose and started spraying. Obviously the rail was very close to me, as my arms are only but so long, and the water sprayed back allll over me. I didn’t even give a shit at this point and wiped the rail down with a dry cloth. Then I ran out back and frantically asked Nick to help me by holding the pieces while I sprayed.
He asked me why I didn’t just lean them up against the house and spray and I remembered exactly why I married him. I wanted to cry happy tears at this genius revelation. Bless you, husband of mine. Bless you. So I did that for the remaining pieces and wiped them all dry.
I sprayed on a coat of primer with my claw hand. In case you were thinking that the hand position of holding the nozzle of a spray paint can and gripping a brush were different enough that my hand might not be in excruciating pain, it is not.

I finished my priming just as it started sprinkling and I wheeled the bed frame into the garage for the night. I went into the house and massaged my hand and requested that Nick hold my beer to my mouth for the rest of the night to accommodate my egregious injury. He declined.
The next day was pretty straightforward, I put on a coat of the black. The paint that I used said I could re-coat immediately so I put on a second coat and let it dry. This particular paint said it would be dry to the touch in about 30 minutes, so I waited that long and then wheeled it back into the garage. I let it completely dry in there, about 48 hours.

Here is the final product in our room with a handy-dandy side by side!

You may notice I also added some navy sheets. My color scheme for the room is coral, gray and navy and since the bedding and walls are so gray and coral, I’m always looking for extra ways to incorporate more navy. I’d like to get a few throw pillows to add to the bed as well!
You may ALSO have noticed (or not, unless you are really analyzing our guest room) those bare dresser/nightstands on either side of the bed. Those are the infamous IKEA Rast dressers that we plan on fixing up and painting to match the room in a future blog post!


![DSC_0704[1]](https://alonglifeblog.com/wp-content/uploads/2015/10/dsc_07041.jpg?w=656&h=439)
![DSC_0710[1]](https://alonglifeblog.com/wp-content/uploads/2015/10/dsc_07101.jpg?w=656&h=439)


It turned out beautiful!! You did a great job. I take it if this whole engineering thing doesn’t work out, furniture refinishing will not be an alternative employment option 🙂
LikeLiked by 1 person
Haha probs not 😐. Or I would only accept non rusty furniture. But who really needs help with that? So that would be pointless
LikeLike